Quick Leads
Capacitor on Circuit Board: A Comprehensive Guide
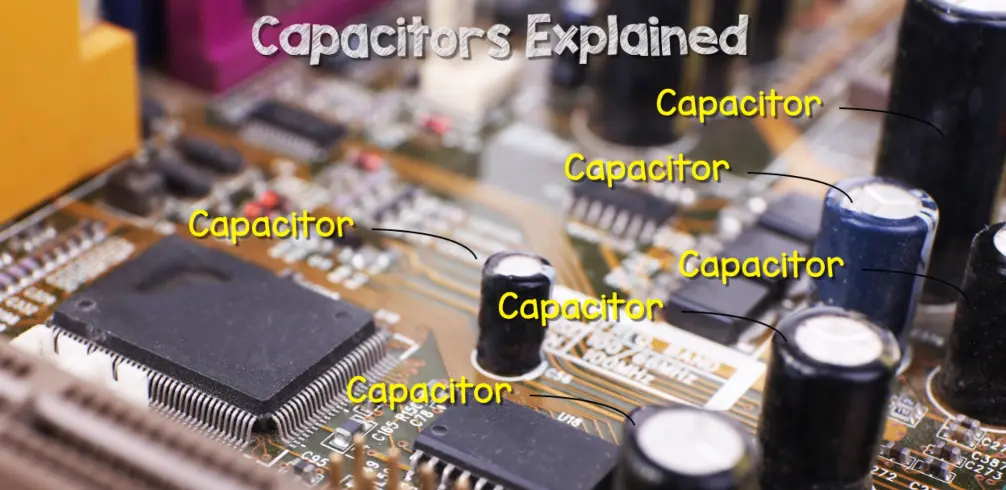
Capacitors are essential components found on most circuit boards. They regulate voltage, smooth out power fluctuations, and store electrical charge. In this guide, we’ll cover everything from different capacitors to how to replace them, troubleshoot problems, and find faults.
What is a Capacitor on a Circuit Board?
A capacitor on a PCB is a passive component that stores electrical energy in an electric field. It is typically used to smooth out voltage fluctuations, store charge for energy bursts, and filter signals. Capacitors do all sorts of things on circuit boards, from managing power to processing signals.

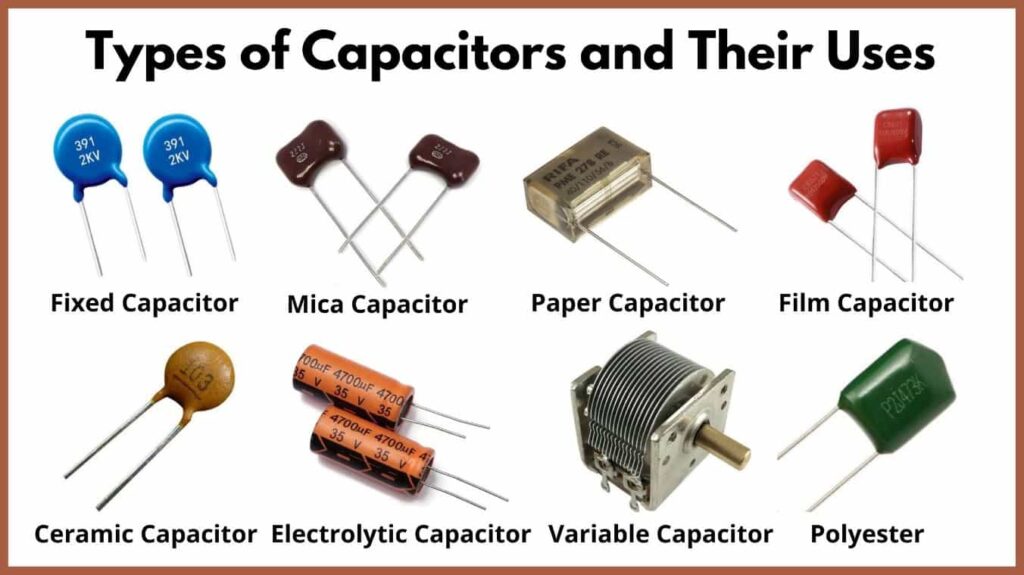
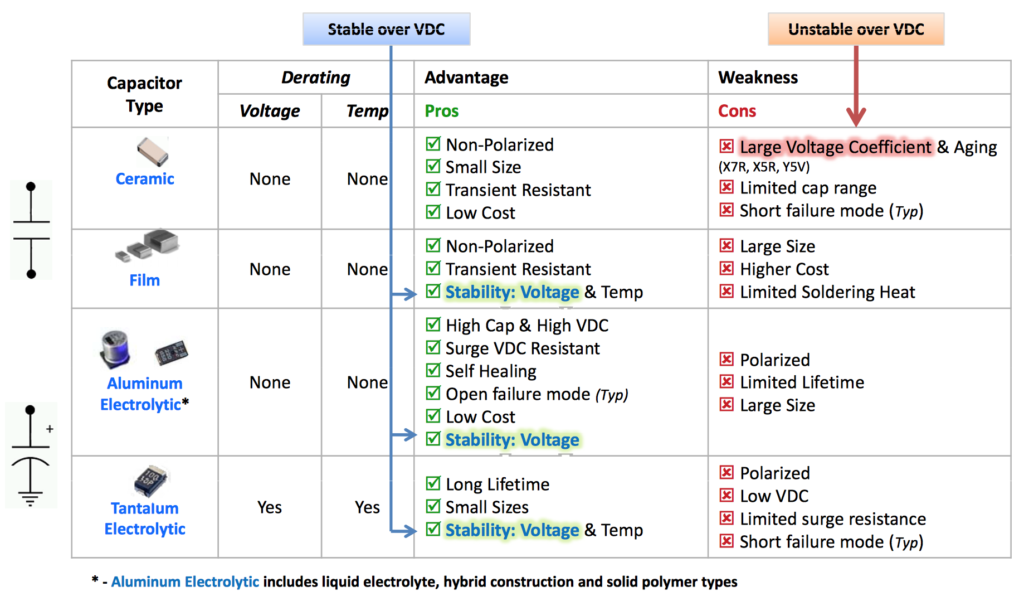
Types of Capacitors on Circuit Boards
Capacitors come in various types, each suited for different applications. Below are the most common types you’ll encounter on circuit boards:
-
Ceramic Capacitors: Widely used for decoupling and noise filtering.
-
Electrolytic Capacitors: Known for higher capacitance values, commonly used in power supplies.
-
Tantalum Capacitors: Compact and stable, often used in consumer electronics.
-
Film Capacitors: Typically used in high-frequency applications.
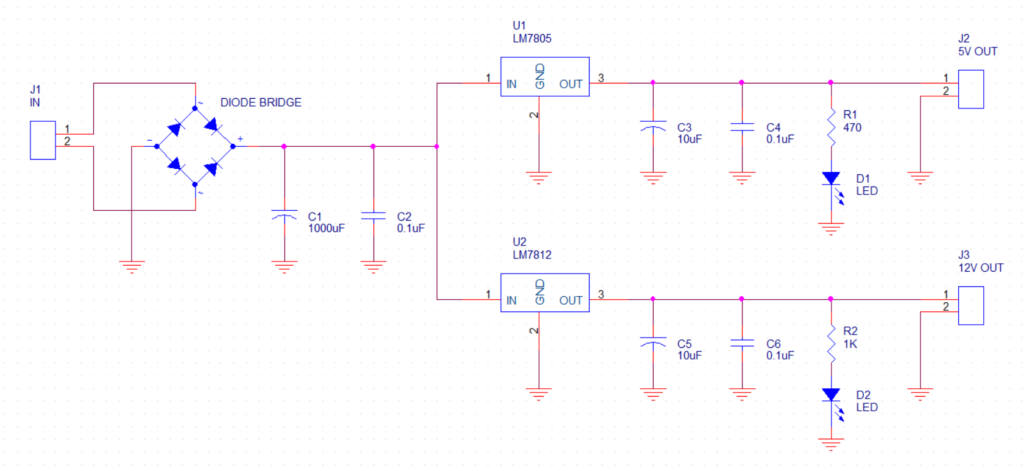
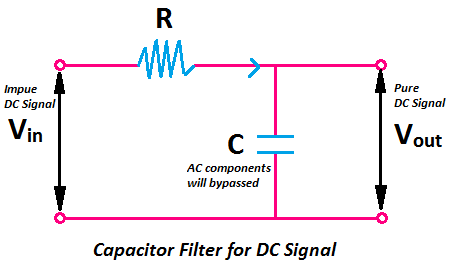
Capacitor on Circuit Board Diagram: Understanding Capacitor Placement
Capacitors go in certain places on a circuit board depending on what they do. For example, power supply capacitors go near the voltage regulators, while capacitors used for filtering signals go along the signal path.
Signs Your Capacitor is Faulty: How to Identify and Troubleshoot
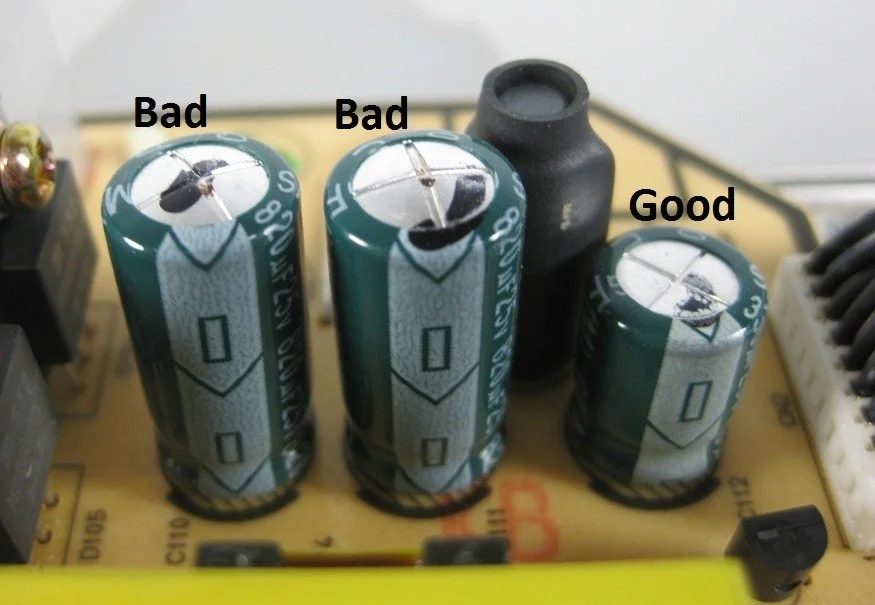
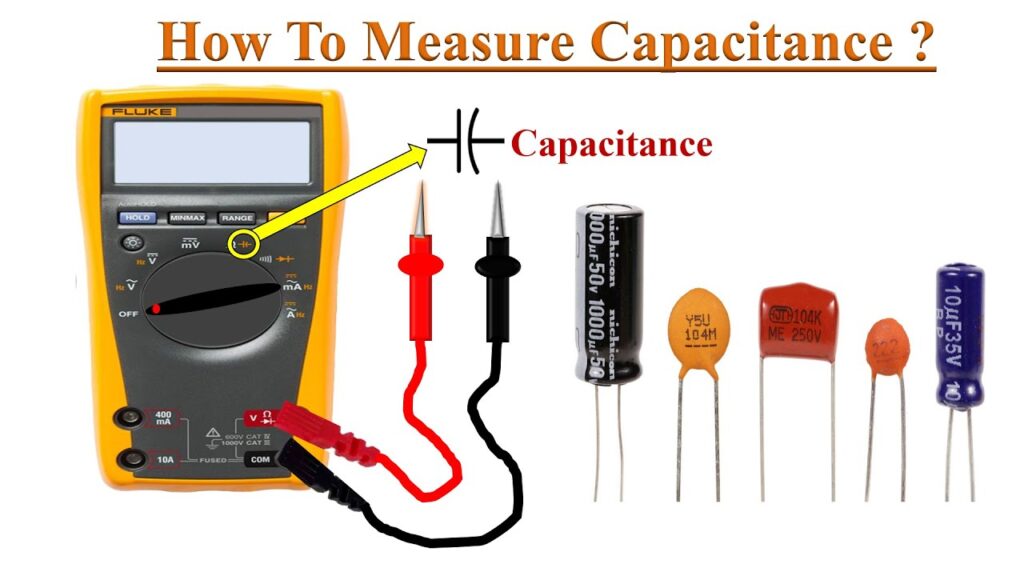
Capacitors can fail over time, and it’s crucial to know the signs of a faulty capacitor. Some common signs include bulging, leakage, or discoloration. A multimeter can also help you test the capacitance and confirm whether a capacitor is still functioning properly.
How to Tell If Your Capacitor is Faulty: Key Signs to Look For
Capacitors usually fail in a few distinct ways. The most common faults include bulging, leaking electrolyte, and burn marks. Identifying these issues early can prevent further damage to the circuit board.
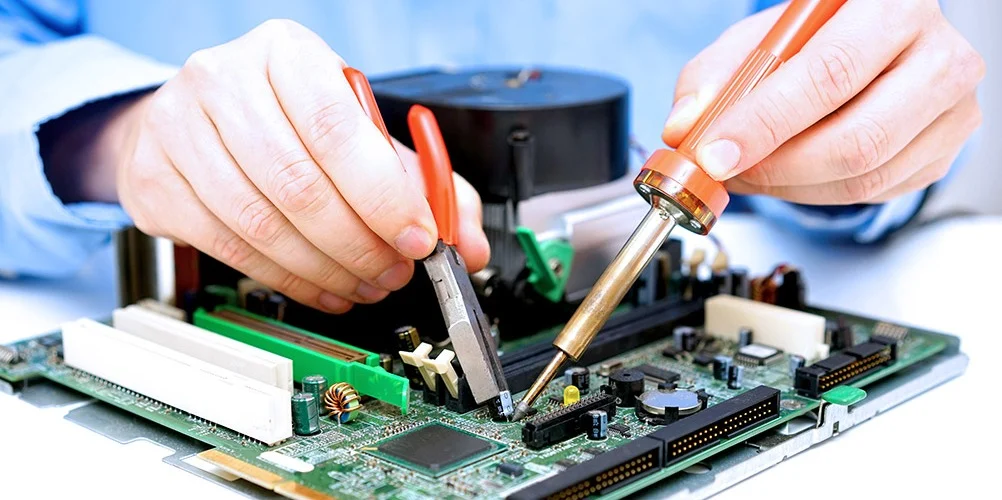
How to Replace a Capacitor: Step-by-Step Instructions for PCB Repair
Replacing a faulty capacitor is a relatively simple process, but it requires precision. Here’s how to replace a capacitor on a PCB, from desoldering the old one to testing the new one.
Step 1: Know when to replace the capacitor
Usually, a damaged capacitor will signal different mischievous properties. Thus, these signals work as an early alert for you to prepare for replacing the capacitor.
-
The screen of your device shoes irregular lines
-
Sometimes you will see flickering on the screen
-
The device will switch on and off irregularly
-
You can’t return the device from its standby mode
-
At the worst, the device won’t turn on
Because the capacitor stores and releases the vital energy to run any device, even a small amount of damage can cause your entire device to sound distorted or not work at all. So, replacing the capacitor is a must.
Step 2: Arrange the tools for capacitor replacement
When you see one or more of the signs of a bad capacitor that we mentioned earlier, you need to get ready to replace the capacitor. Thus, you will need the following accessories:
-
A tool to open the device casing. Preferably, you should use a HEX wrench or screwdriver.
-
Soldering iron and mask
-
The new capacitor ( you have to match its value with the existing capacitor)
Step 3: Access the damaged capacitor
Once you are ready with all of your tools to remove and replace the blown-out capacitor, it’s time to jump into the working steps directly. First, turn off your device appropriately. Then, unplug it correctly from the main electrical outlet for safety purposes.
Now, you need to access the circuit board. For this, open up the casing using the HEX wrench or screwdriver. Make sure you have kept the screws in a separate place safely so that you may access them whenever necessary.
You may check the user manual if you are having trouble opening the device casing and accessing the circuit board. Once you have found the circuit board, bring it under sufficient lighting. It will help you check the circuit board capacitor properly.
You can then find the damaged capacitor with ease. A damaged capacitor may look like:
-
Brownish fluid leaking from the damaged capacitor
-
The capacitor will be corroded and sipping fluid
-
The leads will start coming out of the capacitor
These signs will help you quickly locate the blown-out or damaged capacitor that needs replacement. Also, look at the top of the capacitor. Its top will have a convex shape and bend towards the outside which is opposite of a working capacitor.
Step 4: Remove the damaged capacitor
Before you take out the old capacitor to replace it, make sure you know the voltage, temperature rating, and capacitance of the old capacitor. This is important because you have to replace it with a capacitor that has the same values in order for the device to work right.
Next, locate the location of the soldering point at the back of the capacitor. It would hold the capacitor. Heat your soldering iron and press it against the soldering back of the capacitor. You need to hold down the soldering iron until the capacitor gets loosened from the circuit board. Then, perform the task on the other side to loosen the wiring and remove the capacitor.
Sometimes, the joint may be covered with too much soldering. It will prevent the soldering iron from reaching the exact point. Thus, use a soldering wick to remove the extra soldering from the back of the circuit board. Then, position the heated soldering iron accurately and remove the blown-out capacitor accurately.
You don’t need to hasten the job. Do it in a relaxed mode and it will ensure maximum accuracy.
Step 5: Install the new capacitor
You have to mount the new capacitor in a way so that it maintains the same height as the older one. For this, trim the leads of your newly bought capacitor. Then, carefully position the new capacitor on the soldered holes of the old replacement.
Make sure you put the capacitor in with the right polarity (the positive and negative leads are in the right place). Then, heat the soldering iron and press it against the back of the circuit board right where the capacitor joint is located.
Check when the soldering tip falls into the hole. Then press the wire lead of the board through the soldered hole appropriately. The old soldering joint will securely hold the newly replaced capacitor and help it function accurately.
You have to perform the soldering task on the other side of the circuit board too. Finally, mount the circuit board into the device casing properly to finish off the capacitor replacement task.
Capacitor replacement is straightforward if you follow the right steps. Always check the polarity of the capacitor, make sure you’re using a soldering iron at the right temperature, and double-check your solder joints.
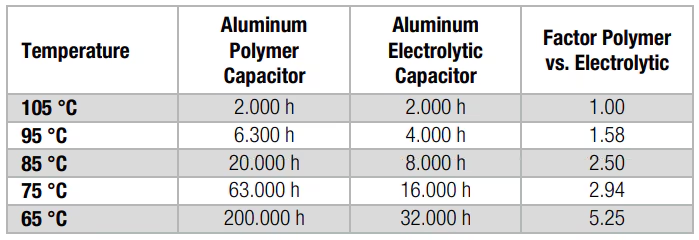
Capacitor Lifespan: How Long Do Capacitors Last on a Circuit Board?
Capacitors don’t last forever. How long they last depends on what kind they are, how you use them, and where you put them. Electrolytic capacitors usually last for about 2,000 to 5,000 hours under normal conditions. Proper usage and maintenance can extend their life.
Why Capacitors are Critical in Circuit Design?
Capacitors are a big deal on circuit boards. They’re especially important for power regulation and signal processing. Without capacitors, electronic devices would be much less stable. Capacitors store energy in an electric field. They let it go when they need to so your circuit works right. That’s why you need them to smooth out power, filter out noise, and give you a little extra energy when you need it.
For example, capacitors are critical in power supply circuits. They store energy and help regulate the voltage. When you’re using capacitors to decouple, you put them right next to the power pins of your ICs to keep noise out and give you clean voltage. When you’re using capacitors to filter, you’re using them to smooth out the waveform of your signals so the output is clean and steady.
Choosing the Right Capacitor for Your Circuit Board
When you design a PCB, you have to pick the right capacitor. If you don’t, your design won’t work. Different capacitors serve different purposes, and they differ in terms of capacitance, voltage rating, and size. Choosing the wrong capacitor can lead to circuit failure, overheating, or reduced performance. Here’s a breakdown of factors to consider when selecting capacitors for your PCB:
-
Capacitance: The value of capacitance determines how much energy the capacitor can store. Depending on what you’re doing, you might need a bigger capacitor to store energy or smooth out voltage. Capacitors are usually rated in microfarads (µF) or picofarads (pF).
-
Voltage Rating: Every capacitor has a voltage rating. That’s the maximum voltage it can take. If you pick a capacitor with too low a voltage rating, it’ll blow up.
-
Tolerance: Tolerance is how much the actual capacitance can be different from the number on the package. For precise applications, a low-tolerance capacitor is necessary.
-
Temperature Range: Environmental factors like temperature can impact a capacitor’s performance. Make sure the capacitor you choose can handle the temperature fluctuations in the circuit’s operating environment.
Common Capacitor Application
Capacitors are found in many critical applications across various devices. Some of the most common applications include:
Power Supply Regulation: Capacitors keep the voltage steady. They stop spikes and dips that can blow up your stuff.
Decoupling/Bypass: In circuits with digital ICs, capacitors are used to keep noise out and keep the power steady.
Signal Filtering: Capacitors are used in filters to let some frequencies through and block others.
Timing and Oscillators: Capacitors are key components in timing circuits and oscillators. They help you make things happen at the right time or at a specific frequency.
If you know where and how to use capacitors, you can design better circuit boards that don’t break.
Frequently Asked Questions (FAQs)
A capacitor on a circuit board stores and releases electrical charge to help keep the voltage steady, filter out noise, and smooth out the power. This ensures stable operation of the circuit and can prevent damage to other components. Capacitors are a big deal. They do all kinds of things like making sure the power supply lines don’t get all messed up, reducing noise, and keeping your circuit from going haywire.
The placement of a capacitor on a circuit board depends on its purpose. Common placements include:
Decoupling capacitors near power supply lines to filter out voltage spikes and reduce noise.
Bypass capacitors across components to smooth out power supply variations.
Coupling capacitors between signal paths to block DC while allowing AC signals to pass through.
Filter capacitors in power supply circuits to smooth rectified voltage.
When a capacitor fails, it can cause several issues depending on its role in the circuit. The most common symptoms include:
Voltage instability: If a capacitor goes bad, it can’t smooth out the voltage anymore, which means you’ll get fluctuating or noisy power, and that can mess up other parts of your circuit.
Circuit malfunction: In the really important places, like decoupling or filtering, if a capacitor goes bad, you can get all kinds of weird stuff happening, like glitches or your whole system crashing.
Complete failure: In some cases, the circuit may stop working altogether. In extreme cases, a leaky or burst capacitor can damage surrounding components.
Yes, capacitors can be replaced on a circuit board, though it requires some skill in soldering. Here’s how to check if a capacitor is bad:
Visual inspection: Look for signs of damage such as bulging, leaking, or discoloration. Electrolytic capacitors are particularly prone to visible damage.
Capacitance test: You can use a multimeter with a capacitance testing mode to measure the value of the capacitor.. If it’s significantly different from its rated capacitance, it may be faulty.
ESR (Equivalent Series Resistance) test: If the ESR is high, that means the capacitor isn’t doing its job, even if the capacitance is fine.
If a capacitor on your motherboard goes bad, it can cause all kinds of problems, like instability, crashes, or your computer might not even boot up. When that happens, you need to replace the capacitor.
To determine if a motherboard capacitor is bad:
Look for physical signs: Inspect the capacitor for bulging, leaking, or burnt marks, which are common indicators of failure.
Use a multimeter or ESR meter: Check the capacitance and ESR of the capacitor. A significantly lower capacitance or higher ESR than the rated values indicates a failure.
Symptoms: If your motherboard is experiencing frequent crashes, instability, or failure to boot, it may be due to a failed capacitor.
Limited Time Offer:
Get $100 off your order TODAY!
 Trusted by 100+ businesses worldwide No hidden fees – transparent pricing Guaranteed quality with on-time deliver
Conclusion
Capacitors are crucial to the functionality and longevity of circuit boards. If you want to fix a circuit board that doesn’t work or design a new one, you need to know what capacitors do, how to pick them, how to test them, and how to replace them. If you do what I say in this guide, your circuits will work great and you won’t have any problems with bad parts.
Request for Quote
RECENT POSTS

PCB Transformer Explained: Types, Working Principle, and Design Tips
Discover how PCB transformers work, their key types, and design integration tips. Learn to select
Why Smart OEMs Avoid Cheap PCB Assembly: 5 Hidden Risks That Cost More
Avoid costly mistakes in OEM projects. Discover why cheap PCB assembly risks quality, compliance, and
RELATED POSTS

Leading PCBA Manufacturer
✅ Assemble 20 PCBAS for $0 ✅ Get $100 OFF – Risk-Free Trial!
✅ 100+ Satisfied Customers
✅ Ensured Quality & On-Time Delivery
✅ Free Trial, No Commitments!