Quick Leads
How the Arduino Nano Pinout Can Elevate Your Next IoT Product: A Comprehensive Guide
Are you an engineer or technician seeking a versatile microcontroller for your next IoT project? The Arduino Nano pinout can unlock new potential for building scalable, high-performance systems. Let’s explore how this small but powerful board can be the key to your next product development, especially if you’re working on high-volume IoT solutions like Shelly’s smart thermostatic valve heads.
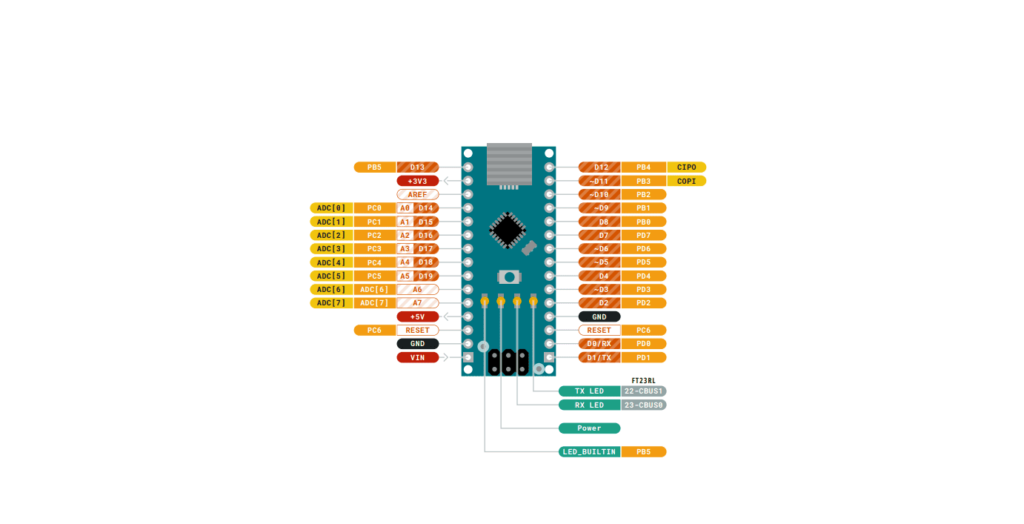
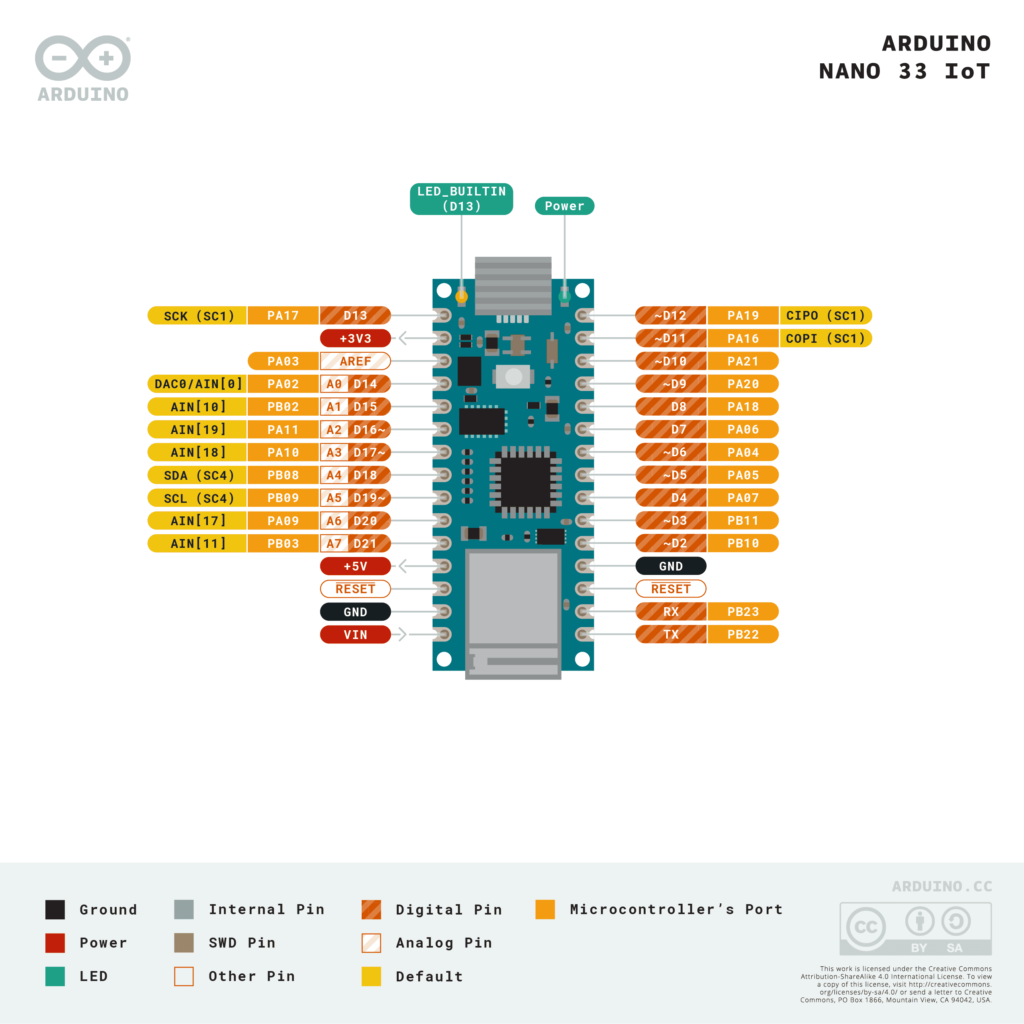
The Arduino Nano pinout includes 30 pins, featuring 14 digital I/O pins, 8 analog inputs, and several power pins, ideal for powering a wide range of sensors, actuators, and communication protocols. Whether you’re designing IoT devices, like Shelly’s smart thermostatic valve head, or other high-volume projects, this microcontroller offers flexible, reliable connectivity.
But how exactly can the Nano help you scale your IoT projects? Let’s break down the individual pins and their applications, as well as explore how to make the most of this powerful microcontroller for your specific needs.
What are the Pins on an Arduino Nano Used For?
The Arduino Nano is known for its compact design and versatility. Despite its small size, it features a rich selection of 30 pins that serve different purposes. Here’s a deeper look at the pins:
Digital I/O Pins (14 Pins)
The digital I/O pins (D0-D13) are among the most versatile pins on the Arduino Nano. These pins can be configured either as inputs or outputs, making them essential for interfacing with a range of external components. Whether you’re controlling a motor, reading a switch, or driving an LED, these pins are where the action happens.
Why It Matters for IoT: These pins can connect to a variety of sensors, actuators, and other electronic components in your IoT project. For instance, you might use a digital pin to control a smart light or a heating valve, like in Shelly’s IoT solutions.
Analog Input Pins (8 Pins)
The analog input pins (A0-A7) are crucial for reading real-world data from sensors. These sensors could measure things like temperature, light levels, or humidity. By using the analog-to-digital converter (ADC) on the Arduino Nano, you can turn analog signals into digital data that can be processed by the microcontroller.
Why It Matters for IoT: If your project requires real-time environmental monitoring (like a smart thermostat), you’ll be relying heavily on these analog pins. For example, you could use an analog pin to read the data from a temperature sensor, allowing you to control the heating system accordingly.
Power Pins (5V, 3.3V, GND)
Power is a big concern in any IoT system. The Arduino Nano provides several power-related pins, including 5V, 3.3V, and GND. These pins are used to power external components, such as sensors, communication modules (Wi-Fi, Bluetooth), and even your custom circuits.
Why It Matters for IoT: When you’re working on high-volume IoT devices, it’s important to understand how to manage power efficiently. For example, if you’re working with a battery-operated IoT device, using the 3.3V pin for low-power components will help extend battery life.
- Arduino Nano Official Documentation
- Description: The official Arduino documentation provides a detailed overview of the Arduino Nano, including its features, pinout, and how to use it for development. This is a must-reference link for any IoT project involving the Arduino Nano.
What are PWM Pins on Arduino Nano?
One of the standout features of the Arduino Nano is the PWM (Pulse Width Modulation) pins. The Nano has 6 PWM pins (D3, D5, D6, D9, D10, and D11), which can be used to simulate analog output.
How PWM Works
PWM allows you to modulate the width of the pulses in a digital signal, effectively creating a signal that mimics an analog waveform. This technique is perfect for controlling devices like:
- LEDs: Dim them by adjusting the pulse width.
- Motors: Control motor speed in automation systems.
- Heaters: Adjust the heating level in smart thermostatic systems.
- Arduino Nano Pinout PDF
- Description: The official Arduino Nano pinout diagram, showing all the key connections and functionality of the Nano’s pins. This is critical for anyone building IoT applications with the Nano.
Why It Matters for IoT:
When developing high-volume IoT products like Shelly’s smart thermostatic valve, PWM pins are crucial for fine-tuning control over components that need precise adjustments, such as controlling the heating element of the radiator valve. PWM ensures you have smooth, efficient control over your device, even in high-volume production.
How to Power the Arduino Nano for High-Volume IoT Projects
For projects that require high-volume production (like Shelly’s smart thermostat or other IoT devices), powering the Arduino Nano is a critical consideration.
Power Options:
- Vin Pin (7-12V): This is typically used when you need to power the Arduino Nano using an external source that provides more than 5V (ideal for high-power IoT setups).
- 5V Pin: This is used when you have a regulated 5V supply. If you’re powering the Nano from a USB source, you can simply connect the board to a computer or power adapter.
- USB Power: During prototyping or development, powering via USB is often the easiest method. It provides not only power but also a data connection for uploading code.
Why It Matters for IoT:
Understanding how to power your Arduino Nano properly can be the difference between a successful product and a battery-draining failure. When you’re dealing with IoT devices like Shelly’s smart thermostatic valve, choosing the right power option will help you ensure the device is efficient, scalable, and reliable—critical for high-volume manufacturing.
- The Ultimate Guide to Arduino Nano Pinout – NextPCB
- Description: This guide breaks down the Arduino Nano pinout for beginners and offers insights into integrating it into projects. Ideal for developers or manufacturers looking to design IoT solutions or PCB assemblies.
How Can Arduino Nano Support IoT Devices Like Shelly’s Smart Thermostatic Valve?
Arduino Nano is a fantastic tool for prototyping IoT products—and it works exceptionally well for high-volume products like Shelly’s smart thermostatic radiator valve. Here’s how:
- Connects to Temperature Sensors: Use the analog pins to read temperature data from sensors.
- Controls Actuators: Use PWM pins to control the valve actuators, adjusting the radiator to the desired temperature.
- Enables Remote Control: The Arduino Nano can interface with Wi-Fi or Bluetooth modules, allowing for remote control via apps, a feature Shelly might use for their home automation products.
By leveraging the Arduino Nano’s pinout, you can design a prototyping platform that’s both flexible and scalable, ideal for high-volume production like Shelly’s smart products. Once your prototype is complete, you can transition seamlessly into PCB assembly for large-scale manufacturing.
Arduino Nano Pin Numbers: Understanding the Layout for PCB Design
As an engineer or technician, understanding the Arduino Nano pinout is essential for creating custom PCBs or modifying existing circuits. The Nano is known for its compact size, but the layout of the pins is still quite critical for your designs.
Pinout Layout:
- Digital Pins (D0-D13): Located on one side of the board.
- Analog Pins (A0-A7): Located on the other side of the board.
- Power Pins: These are distributed across the board, but it’s important to know where each pin is located for PCB design.
Why It Matters for IoT:
If you’re designing a custom PCB for your IoT device, ensuring that your design matches the Arduino Nano pinout is crucial for making your development and manufacturing process as smooth as possible.
What is the Role of Analog Pins in Arduino Nano?
The analog pins on the Arduino Nano (A0-A7) are crucial for reading signals from analog sensors, which is often required in IoT devices.
Analog Signal Conversion:
The Arduino Nano converts analog signals into digital values using an ADC (Analog-to-Digital Converter). This is what allows you to measure and process data from temperature sensors, light sensors, or other environmental sensors in your IoT product.
Why It Matters for IoT: When developing products like Shelly’s smart thermostat, you’ll likely need to read analog data to control your devices. The analog pins ensure that data is accurately captured and processed, allowing for precise control over things like temperature and light.
- Comprehensive Guide to Arduino Nano Pinout – PCB Hero
- Description: A detailed blog that dives deep into the Arduino Nano pinout, explaining its pins, capabilities, and best practices for use in DIY projects and IoT development.
FAQs
Digital pins are used to read or send binary (on/off) signals, while analog pins are used to read continuous signals (like temperature or light levels) and convert them into a digital format.
Yes! You can integrate Wi-Fi or Bluetooth modules (like ESP8266 or HC-05) with the Arduino Nano for wireless communication, making it suitable for remote IoT applications like home automation.
You can use the Vin pin for external voltage (7-12V), the 5V pin for regulated power, or simply power it via USB for development. Choose based on the power needs of your IoT product.
For mass production, focus on custom PCB designs that align with the Arduino Nano's pinout and ensure efficient power management and reliable communication between components.
Limited Time Offer:
Get $100 off your order TODAY!
 Trusted by 100+ businesses worldwide No hidden fees – transparent pricing Guaranteed quality with on-time deliver
Summary
By now, you should have a thorough understanding of how the Arduino Nano pinout can play a central role in your IoT projects, especially in high-volume applications. The Nano’s flexibility in handling a variety of components, sensors, and actuators makes it the ideal microcontroller for prototyping and scaling your designs. Ready to bring your IoT product to life? Reach out to us for expert PCB assembly services, and let’s make your ideas a reality!
Have Specific Requirements?
We’re here to help! Whether it’s a custom PCB design, assembly, or sourcing components, feel free to reach out to us directly. Our team is ready to provide tailored solutions for your project. Contact Us Today for more information.Additional Resources:
- How to Repair Circuit Boards: A Step-by-Step Beginner’s Guide
- Capacitor on Circuit Board: A Comprehensive Guide
- What Are PCB Conformal Coatings? Types, Benefits, and Applications Explained
- SMD Size Codes Explained: A Complete Guide to Understanding Surface-Mount Component Dimensions
- AC vs DC: Key Differences, Applications, and Advantages in Modern Electronics
Request for Quote
RECENT POSTS
IC Boards Explained: Applications, Layout Tips, and Assembly Services
Discover what IC boards are, how they’re used in modern electronics, and how to design
HDI PCB vs Multilayer PCB: How to Choose the Right One for Cost, Signal Integrity & Manufacturing
HDI PCB vs multilayer PCB explained from a manufacturing and assembly perspective. Learn how cost,
RELATED POSTS

Leading PCBA Manufacturer
✅ Assemble 20 PCBAS for $0 ✅ Get $100 OFF – Risk-Free Trial!
✅ 100+ Satisfied Customers
✅ Ensured Quality & On-Time Delivery
✅ Free Trial, No Commitments!