
PCB silkscreen problems rarely show up during design—but they often cause serious issues during assembly and inspection. Text becomes unreadable, markings disappear, and operators make mistakes. These small errors can lead to costly rework and delays. This guide explains PCB silkscreen design guidelines with practical engineering reference values to help create readable, manufacturable, and inspection-ready boards.
PCB silkscreen design guidelines focus on text readability, line width, clearance, and correct marking placement. As general engineering guidance, designers can use the following values as a starting point:
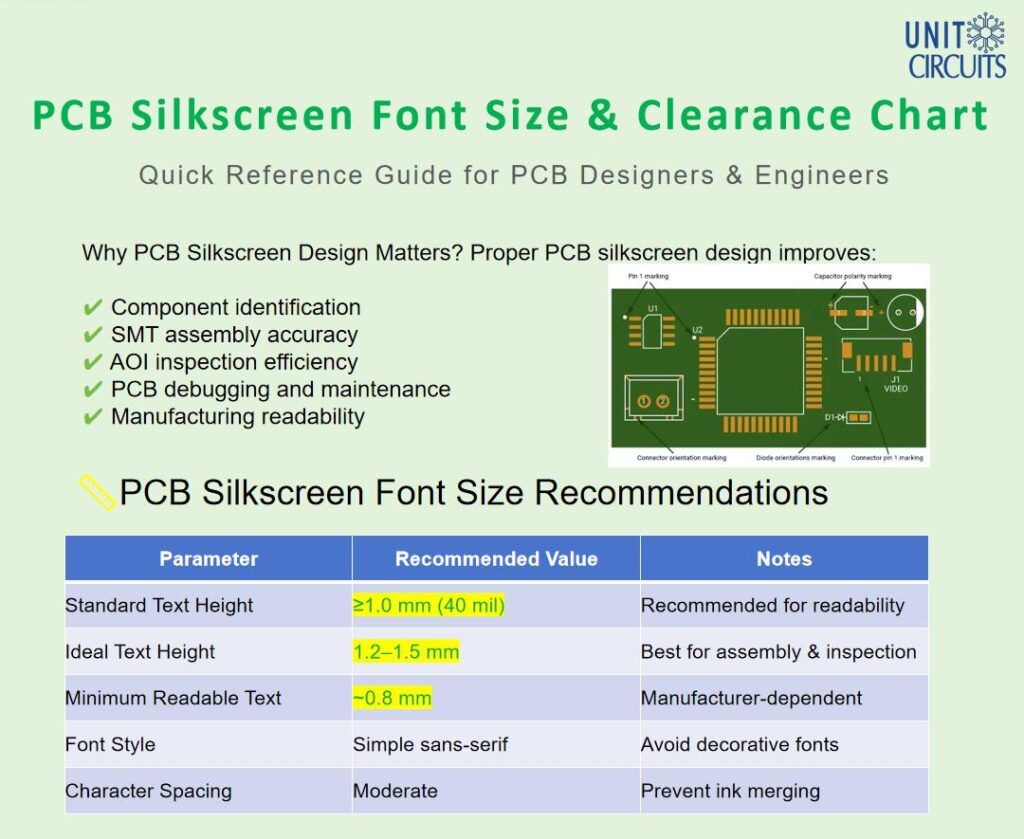
- Text height: ≥1.0 mm is generally preferred; 1.2–1.5 mm provides better readability where space allows
- Line width: ≥0.15 mm (6 mil) is a practical starting point
- Silkscreen-to-pad clearance: approximately 0.1–0.15 mm (4–6 mil) or more
- Pad and solder mask openings: avoid placing silkscreen over exposed solderable areas
- Critical markings: keep reference designators, Pin 1 indicators, and polarity marks clear and visible
Note: These values are general PCB design references rather than universal manufacturing limits. Actual silkscreen capabilities vary by printing process, board design, and PCB manufacturer.
Quick Leads-PCBA
What Is Silkscreen in PCB?
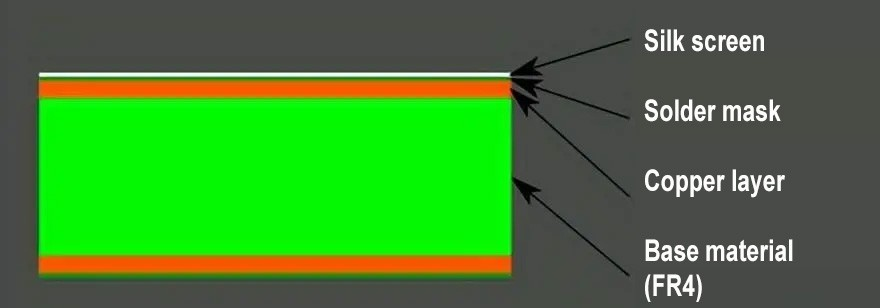
PCB silkscreen is the printed layer used for component labels, polarity indicators, and assembly markings. It helps engineers, assemblers, inspectors, and service technicians quickly identify components and important board markings.
To better understand its role in PCB design and manufacturing, refer to our complete guide to PCB silkscreen.
What Are the Recommended PCB Silkscreen Design Rules?
What Is the Minimum PCB Silkscreen Font Size?
As a general design guideline, a PCB silkscreen text height of 1.0 mm (about 40 mil) or larger is preferred for reliable readability. Where board space allows, 1.2–1.5 mm text provides better visibility during assembly and inspection.
Text around 0.8–0.9 mm may be achievable with some manufacturing processes, but readability depends on the font, stroke width, printing method, and PCB manufacturer’s capabilities. For critical reference designators and polarity markings, avoid designing to the absolute printing limit.
What Is the Minimum PCB Silkscreen Line Width?
As a general engineering reference, a silkscreen line width of at least 0.15 mm (6 mil) is a practical starting point for PCB design. Where space permits, using approximately 0.18 mm or wider can improve print robustness and readability.
Very thin strokes may print inconsistently, break, or become difficult to read. Actual minimum line-width capability depends on the silkscreen printing process and PCB manufacturer’s production capabilities.
Best PCB Silkscreen Font
For PCB silkscreen, use a simple sans-serif font with consistent stroke width and clear character spacing. Avoid decorative, condensed, or overly complex fonts that may become difficult to read after printing.
Good character differentiation is also important. Letters and numbers such as O/0, I/1, and S/5 should remain easy to distinguish on the finished PCB.
A clear PCB silkscreen font improves readability during assembly, inspection, debugging, and maintenance.
PCB Silkscreen Clearance
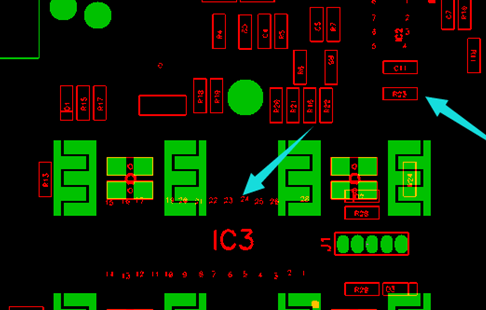
PCB silkscreen clearance is the spacing between printed silkscreen features and pads, solder mask openings, vias, or other restricted board areas. Maintaining adequate clearance helps keep markings readable and prevents silkscreen ink from interfering with solderable surfaces.
As a general engineering guideline:
- Silkscreen-to-pad clearance: approximately 0.1–0.15 mm (4–6 mil) or more
- Fine-pitch areas: consider 0.15 mm or greater where board space allows
- Exposed solderable pads: keep silkscreen outside the solder mask opening
- Vias: check whether the via is exposed, tented, or otherwise covered before placing nearby markings
Exact clearance requirements depend on the PCB manufacturer’s CAM rules, printing process, and board design.
What Clearance Is Required for SMT Pads?
For SMT pads, maintaining approximately 0.1–0.15 mm (4–6 mil) of silkscreen clearance is a practical general guideline. Where space permits, additional clearance can reduce the risk of markings being clipped during CAM processing.
For dense component areas, including QFN and BGA layouts, avoid forcing reference designators or component outlines into limited spaces simply to keep them close to the component. Move non-critical markings to a clearer location when necessary.
The final acceptable clearance should always follow the PCB manufacturer’s specific design and CAM requirements.
How Does PCB Silkscreen Support Assembly and Inspection?
Clear PCB silkscreen helps assembly operators, inspectors, and technicians identify reference designators, component orientation, polarity, and other important board information.
During manual inspection, rework, and troubleshooting, readable markings make it easier to locate components and verify assembly details. This is especially useful when comparing the assembled PCB with the schematic, BOM, and assembly documentation.
Automated Optical Inspection (AOI) does not rely solely on PCB silkscreen. AOI systems typically use programmed inspection data and visual features of the assembled board to detect placement, polarity, soldering, and component defects. However, clear silkscreen markings remain useful for manual verification and follow-up inspection.
For this reason, silkscreen should be designed primarily for clarity, correct placement, and human readability, rather than specifically for AOI recognition.
Why Is Silkscreen Removed During PCB Manufacturing?
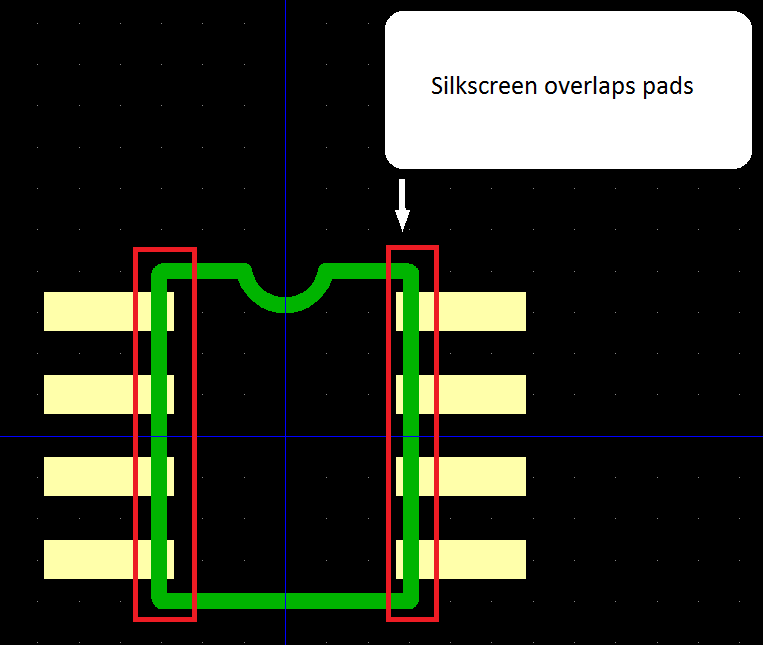
Silkscreen may be clipped, trimmed, or removed during CAM processing when text, symbols, or component outlines overlap exposed pads, solder mask openings, or other areas that must remain free of ink.
Common causes include:
- Reference designators placed too close to component pads
- Text or symbols extending into solder mask openings
- Component outlines crossing exposed solderable areas
- Insufficient silkscreen-to-pad clearance
- Features that are too small for the selected printing process
PCB manufacturers may adjust conflicting silkscreen artwork to protect solderability and maintain manufacturing reliability. As a result, part of a reference designator or symbol may disappear from the finished PCB.
To reduce silkscreen clipping, maintain adequate clearance and review the final Gerber files before production.
Common PCB Silkscreen Design Mistakes
- Printing over pads
- Using text too small to read
- Missing polarity or Pin 1 indicators
- Overcrowded layouts
These issues can lead to assembly errors, increased rework, and inspection delays. For more examples and prevention strategies, see our guide to common PCB silkscreen mistakes.
PCB Silkscreen Design Rules Table (Engineering Reference)
The following table summarizes practical PCB silkscreen design guidelines for quick reference. These values are general engineering recommendations and should be verified against your PCB manufacturer’s specific capabilities before production.
| Design Parameter | General Recommendation | Why It Matters |
|---|---|---|
| Text Height | ≥ 1.0 mm (40 mil) preferred | Improves readability after printing |
| Text Height Where Space Allows | 1.2–1.5 mm | Provides better visibility during assembly and inspection |
| Line Width | ≥ 0.15 mm (6 mil) | Reduces the risk of broken or faded strokes |
| Silkscreen-to-Pad Clearance | Approx. 0.1–0.15 mm (4–6 mil) or more | Reduces clipping near exposed pads |
| Exposed Pad Overlap | Avoid | Helps keep solderable surfaces free of ink |
| Solder Mask Openings | Keep silkscreen outside openings | Reduces clipping during CAM processing |
| Font Style | Simple sans-serif with consistent strokes | Improves character readability |
| Polarity / Pin 1 Marks | Keep clear and visible where required | Helps prevent orientation errors |
| Reference Designators | Place near components without overlapping pads | Supports assembly, inspection, and troubleshooting |
Note: Minimum printable features can vary with the silkscreen printing method, ink, board layout, and manufacturing process. For dense or fine-pitch designs, confirm the final requirements during DFM/CAM review.
Manufacturing Limitations of PCB Silkscreen
PCB silkscreen resolution and minimum printable features depend on the printing method, ink, board surface, and manufacturing process. Traditional screen printing is widely used for PCB production, while digital or inkjet printing can support finer markings in some applications.
Designers should avoid relying on the smallest theoretically printable text or line width. A silkscreen design that works with one manufacturing process may require adjustment with another, especially when moving between suppliers or production processes.
For a detailed comparison of available processes, see our guide to PCB silkscreen printing methods.
Common PCB Silkscreen Symbols
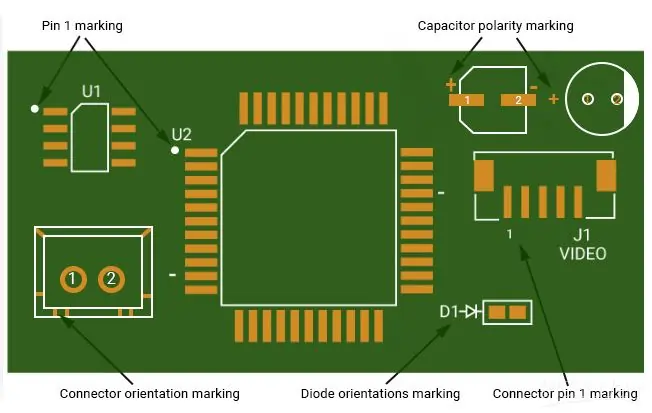
PCB silkscreen commonly includes reference designators, Pin 1 indicators, polarity marks, connector labels, test-point identifiers, revision information, and other assembly markings.
From a design-for-manufacturing perspective, the most important requirement is that critical symbols remain readable, correctly positioned, and visible after component assembly. Polarity and orientation markings should not overlap exposed pads or disappear beneath components where technicians cannot see them.
Common reference designators include R for resistors, C for capacitors, D for diodes, U for integrated circuits, and TP for test points.
For a more detailed explanation of PCB silkscreen symbols and their practical functions, see our guide to what PCB silkscreen is used for.
Are There IPC Standards for PCB Silkscreen Design?
There is no single universal IPC rule that defines one mandatory silkscreen font size, line width, or clearance value for every PCB design and manufacturing process.
IPC standards can provide relevant guidance for PCB documentation, land-pattern design, markings, and acceptability, but the actual printable silkscreen limits depend on the PCB manufacturer’s process capabilities.
For example, IPC-7351 is primarily associated with surface-mount land pattern design and includes considerations relevant to component identification and board documentation. IPC-A-600 provides acceptability criteria for printed boards, but it should not be interpreted as a universal silkscreen design-rule table.
Therefore, values such as 1.0 mm text height, 0.15 mm line width, and 0.1–0.15 mm clearance in this guide should be treated as practical engineering references rather than mandatory IPC requirements.
For production designs, always compare general design guidance with the PCB manufacturer’s current fabrication capabilities and DFM requirements.
Practical PCB Silkscreen Design Tips
- Place labels near components but outside pads
- Keep polarity markings clear and visible
- Use consistent text orientation
- Prioritize readability over density
- Keep reference designators visible after component placement
- Review the silkscreen layer in the final Gerber files before production
Design PCB silkscreen from the perspective of the people who will assemble, inspect, test, troubleshoot, and maintain the finished board. A marking has little practical value if it is unreadable, hidden beneath a component, or removed during CAM processing.
Check PCB Silkscreen Before Releasing Gerber Files
Before releasing a PCB design for manufacturing, review the top and bottom silkscreen layers together with the solder mask and component placement data. Check that:
- Reference designators are readable and correctly associated with components
- Polarity and Pin 1 markings are visible
- Silkscreen does not overlap exposed solderable pads
- Important labels are not hidden beneath components
- Text orientation is consistent where practical
- Board revision and identification markings are correct
A final silkscreen review can catch simple documentation errors before they become manufacturing or assembly problems.
PCB Silkscreen vs Solder Mask
Understanding the difference between these two layers is critical. For a detailed comparison, see our guide on PCB silkscreen vs solder mask.
In short:
- PCB silkscreen is used for labeling and identification
- Solder mask provides insulation and protection
What Is PCB Silkscreen Used For?
In real-world applications, PCB silkscreen is used for component identification, polarity marking, and assembly guidance. If you want to explore practical use cases, check out our detailed article on what PCB silkscreen is used for.

FAQs
1. Can PCB silkscreen color affect readability and inspection?
Yes, PCB silkscreen color significantly impacts readability and inspection efficiency. White silkscreen on dark solder masks (green, black, blue) offers the best contrast. Poor color combinations can reduce visibility for operators and AOI systems, increasing inspection errors. For high-reliability products, always choose high-contrast silkscreen colors to improve clarity and reduce misinterpretation during assembly.
2. How do I optimize PCB silkscreen for high-density (HDI) designs?
In high-density PCB designs, space is limited, so prioritize critical markings like polarity and reference designators. Use compact but readable PCB silkscreen font sizes, avoid redundant labels, and place markings outside dense component areas. In extreme cases, consider moving non-critical information to documentation to maintain manufacturability and avoid silkscreen clipping.
3. Does PCB silkscreen impact PCB cost?
PCB silkscreen cost is usually low, but complex designs can increase manufacturing time. Excessive markings, very fine text, or multi-layer silkscreen requirements may add processing steps. Optimizing your silkscreen design guidelines—keeping it simple and manufacturable—helps control cost while maintaining functionality.
4. What files are required to define PCB silkscreen correctly for manufacturing?
To ensure accurate PCB silkscreen fabrication, include clear silkscreen layers in your Gerber files (Top Overlay and Bottom Overlay). Make sure text, polarity marks, and outlines are properly defined and pass DRC checks. Well-prepared manufacturing files reduce misinterpretation and ensure your PCB silkscreen design is produced as intended.
Need Help Reviewing Your PCB Design for Manufacturing?
If you are preparing a PCB or PCBA project for production, our team can review your Gerber files, BOM, and assembly requirements before quotation. We support PCB manufacturing, component sourcing, and PCB assembly for prototype and production projects.
Send us your Gerber files and BOM for a fast quotation and manufacturing review.
Request for Quote
sales@unitcircuits.com
Summary
Good PCB silkscreen design requires readable text, adequate line width, sufficient clearance from exposed pads and solder mask openings, and clear placement of reference designators, polarity marks, and Pin 1 indicators.
As general engineering guidance, 1.0 mm or larger text height, 0.15 mm or wider line width, and approximately 0.1–0.15 mm or more silkscreen-to-pad clearance provide practical starting points. These values are not universal manufacturing limits and should be confirmed against the PCB manufacturer’s specific process capabilities.
Before releasing a PCB for production, review the final Gerber files to make sure critical silkscreen markings remain readable, correctly positioned, and clear of solderable areas.
Related PCB Silkscreen Topics:
RECENT POSTS
What Are PCB Silkscreen Design Guidelines? (Clearance, Font Size & DFM Rules Explained)
Learn PCB silkscreen design guidelines, including font size, clearance, and DFM rules. Improve readability, prevent
What Is PCB Silkscreen Used For? Functions, Symbols & Practical Examples
Learn what PCB silkscreen is used for, including symbols, functions, and real applications. Improve assembly
RELATED POSTS
Leading PCBA Manufacturer
✅ Assemble 20 PCBAS for $0 ✅ Get $100 OFF – Risk-Free Trial!
sales@unitcircuits.com
✅ 100+ Satisfied Customers
✅ Ensured Quality & On-Time Delivery
✅ Free Trial, No Commitments!

 Assemble 20 PCBAS for $0